Rainbow Cake
The rainbow cake is probably one of my best attempts at baking so far. Who doesn't like rainbows? I mean I still go, "Hey, look rainbow!" every time I spot one just like I used to as a child. Then, a rainbow was a promise...a promise from my friend up above...
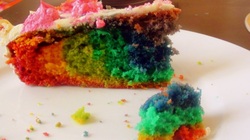
Whatever the rainbow means to you, the rainbow cake will not disappoint you.
Take my word, the little extra effort involved is totally and I mean TOTALLY worth it. It's a big hit especially with kids. I could tell my little boy was so stimulated watching this colourful slice of cake. I knew those big eyes filled with wonder were trying to tell me, "This is interesting!".
My 2 little Danish neighbour boys loved the idea of a rainbow cake. They don't know English yet. They're still small. But, I got them to learn the rainbow colours in English with this cake.
Just perfect for those surprises you want to spring on, birthday parties you want to make special or just colour you want on your plate on those gloomy days, a rainbow cake nails it for you. It's a promise. A rainbow promise!
Ingredients
2 1/2 cups self raising flour
2 1/2 teaspoon baking powder
1/4 teaspoon salt
125 grams unsalted butter
1 1/4 cup sugar
4 eggs
1 teaspoon vanilla essence
Food Colours
Method
Begin by preheating the oven to about 160 Deg C. Beat together the butter and sugar. Add eggs one at a time. Add the vanilla essence and mix well. Sift in the flour in batches and continue mixing until the batter is smooth and without any lumps. Pour equal portions of the batter in 6 different containers and leave one portion in the same bowl that you have mixed. So you have 7 equal portions of the batter. Now add the food colours one by one to prepare the 7 colours of the rainbow. Be careful and do not mix any spoons, lest you have a smudged rainbow. You needn't buy all 7 colours. Get back to the basics of mixing primary colours that you learnt back in school. For example, red and blue gives violet, red and yellow gives orange and so on. Now once you have the coloured batter ready, grease your baking tray. Begin pouring the first colour in the centre of the tray. Remember centre is the key. Let the colour slowly spread out. Carefully, pour the second colour again in the centre. You will notice the first colour quickly moving to the outer periphery. Likewise, add the remaining colours. Remember, each time you add, do it only in the centre. Allow the colours to spread out. The first colour you added would have been pushed to the ends of your plate, that's perfectly fine. Bake at 160°C for about 55 to 60 minutes or until when a skewer inserted in the centre comes out clean. Remove and place on a cooling rack.
For the vanilla buttercream frosting:
Ingredients
125 grams unsalted butter
3 cups icing sugar
2 tablespoons milk
1 teaspoon vanilla essence
Method
Beat the butter well. Slowly add sugar (1/2 cup at a time with milk). Beat for about 5 minutes. Add the vanilla and mix well. Spread on the cake. You could also transfer it to an icing bag and get creative with your designs. Decorating the cake with multicoloured gems or sprinkles looks great too.
Looking for more desserts? Click here